My normal free edge nail shape is squoval and since the last shaping post I've been rocken the square. Unfortunately, it was making me feel like I had slight man hands. You see, I have pretty large wide square palms and wide nail beds and fingers and I felt like the square nail shape was accentuating the butchiness. I must say, I was really looking forward to a change.
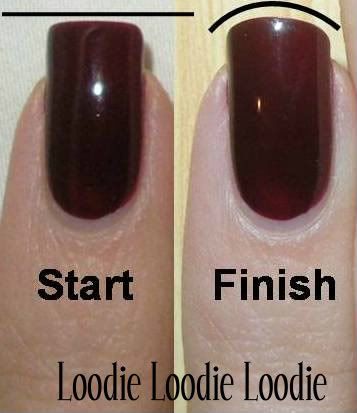
Lets start with some before and after shots. I have two fingers to show you. First my pinkie.
My pinkie has a higher arching C-curve and as a result the free edge is much easier to shape into a square. However, in my opinion, it's also much harder to shape into an oval or round. The degree of the convex shape (more oval or less oval and round like) that you can obtain will depend on your natural C curve. This was really as oval as I could get it. Some could even argue that this is squoval like. What ev's.
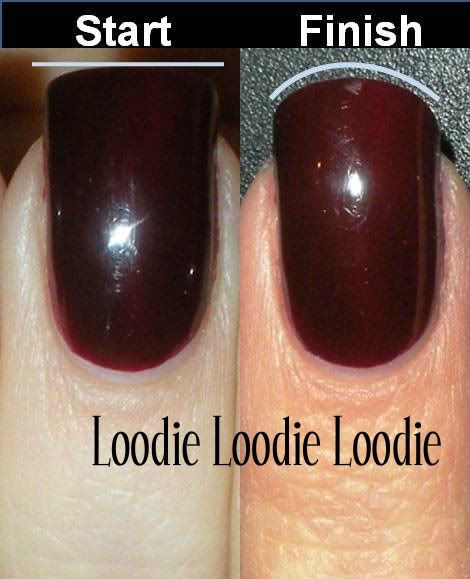
This is my ring finger. This finger slightly flairs at the free edge because the C-curve is not as high, therefore whenever I try to shape the nail into the square shape it looks slightly softer than my pinkie, pictured above. It was much easier to shape into the oval shape.
Before we begin, I suggest getting familiar with some nail file lingo. You must use the right file for the job to prevent damaging the nail plate, preventing peels and maintain the overall health of the nail plate. That post can be found here. It describes my preference and suggestions as well as explanations for the files I use, grit strength, etc. Furthermore, the following posts are helpful for general filing, and tips:
Taking down length
Shaping into a square
Lets start.

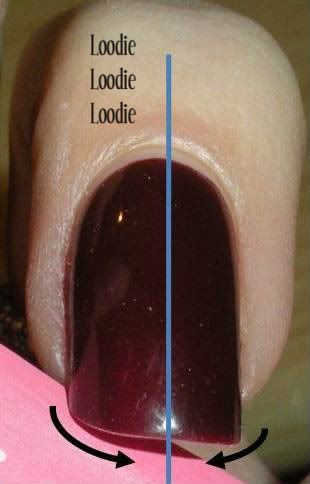
The oval and round shapes have no corners, duuh pretty obvious, so our first step is to eliminate them. Again, depending on your own C-curve, this maybe be tedious or a piece of cake. The safe way to do this is to file from corner to middle as shown in the picture. Avoid the sidewalls close to where the nail tip grows. You can find some pictures and an explanation for why in this post. To avoid this sensitive area, hold the file at a 45° angle to start, then sweep to the middle. At the end of that sweep you want to maintain the file at a slight angle. If the file starts to go horizontal to the nail tip it will create a flat nail tip and will look like a squoval. Do each side separately and try to maintain the round/oval shape. I prefer to do this step with a 220/320 file since my nails are fairly hard and thick. Use a 400 file if your nails are soft or thin. If you prefer a glass file then use it.
To further refine the round/oval shape, hold the file at a 45° angle again but this time get slightly under the nail free edge. This will further help to round free edge and get rid of any nail shavings. Use a 400/600 file to refine the shape. The 600 grit file will also help seal the nail plate and prevent peeling or ripping the nail plate layers.
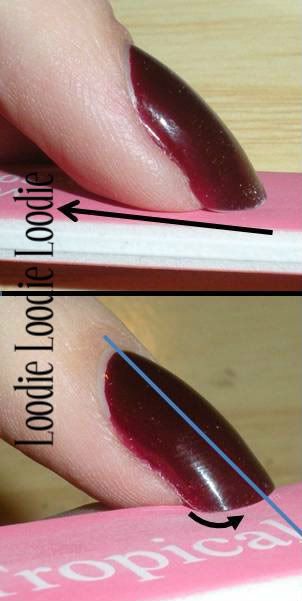
The 'nail shavings" I talked about in Ready, Set, FILE! - Square may also be prevalent here. Here is how to get rid of them while maintaining the oval shape.
1. Place the nail on top of a file at a 45° to the file, as pictured.
2. File down in one direction.
Use 400/600 grit file for this.
Although these steps will help seal the nail plate, sealing is best done with the polish off and will be covered here.
I realize this step is only useful if you have significant free edge to work with, otherwise just do the underneath sweep as pictured to the left, being careful not to injure the precious sidewall.
The 'ontop' nail shavings can be handled in the same way as in the square shape post.

The higher your C-curve the more changes you will see in profile. Here is an example. The top photo is sort of a squoval shape, while the bottom is oval/round. The tip is more blunt in the squoval and pointier in the oval/round.
Now you are ready to take off the polish and seal the plate further!You can find that post here.
The next post in this series: Squoval!
Very informative!! Thanks for mentioning my post. I prefer to use my glass/crystal file for shaping natural nails :)
ReplyDeleteI just can't seem to get into crystal nail files. Essentially, there is only one grit strength. It works well for shaping, but I don't like it for filing down or sealing the natural nail plate. Normal nail files have a great variety of grit strengths, with the same grit strength as a crystal file and some are even finer, which is why I like them best for sealing. I went in detail here:
ReplyDeletehttp://loodieloodieloodie.blogspot.com/2010/11/x-files.html
Betty's bright red long pointy nails toward the end of Season 2 of MadMen made me really want to attempt that retro shape/style. Because I won't file my sidewalls (never!!!) and because I have a pronounced C-curve I ended up with super crazy long ovals. I grew them a bit more trying to achieve the shape but my nails started to look freaky (in a bad way) and it seemed impossible to get that shape. Now I know why! I'm kinda over that mini obsession anyway. I don't think it's possible to wear that shape/style with real nails without damaging the sidewalls horribly. I think they probably filed the January Jone's real nails down to nubs and applied beautifully crafted falsies.
ReplyDeleteI'm lucky my nails are naturally strong and grow fast. (If only I could say that for my hair...!) As I get on in my mid 40's, my formerly fairly long and thin fingers are changing shape--one by one! My fingers have widened (which makes them look shorter than they are), most of my knuckles have especially widened, and I'm beginning to develop arthritic nodules on the small, top knuckles of my pinkies! For some reason too it's my right index and right middle fingers whose knuckles are more drastically enlarged (meaning, wider with rings not fitting over the knuckle anymore; and crooked looking. I fear what they'll be like in twenty years. Witchy I think. But alas, for now they're not so bad (unless I compare them th their former glory and perfection!). I'm wondering which nail shapes and lengths would downplay the knuckles. I'm inclined to think a short, barely over the finger tip oval or squoval wearing nude polish would be appropriate. Would long, square or squoval nails with striking colors simply serve to draw attention to less-than-youthful looking hands? Should older women avoid long nails and loud colors? Does it seem "witchy"?
ReplyDelete