I have received a lot of questions/requests on this hair...
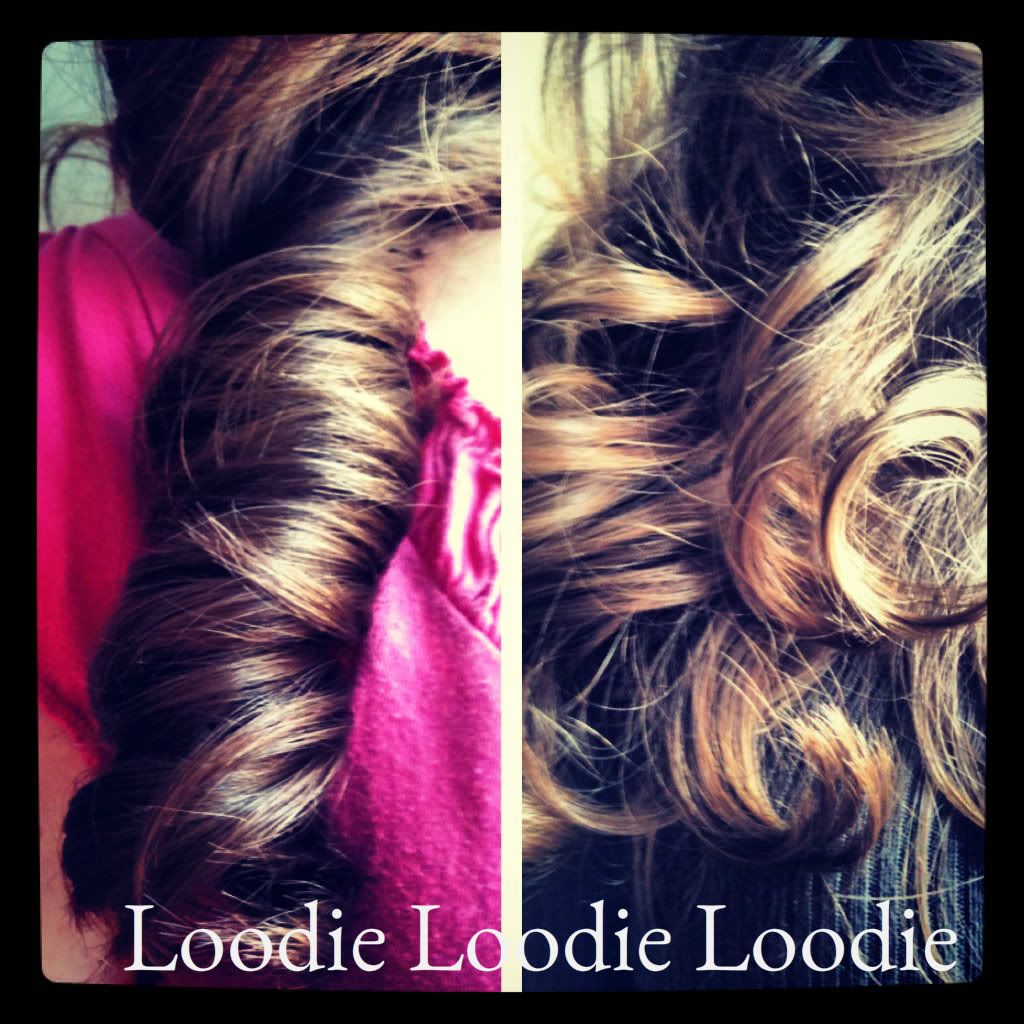
One big hair curl
If your hair already has slight curl or wave, this look is pretty dang easy to achieve. I made a video on my YouTube channel!
All you need is a basic flat iron, hair tie, and brush. I don't normally use hair products for this, but if it helps you keep your curls feel free to add them. I use a very low temperature setting, 220 C, but you'll have to find what temperature works best for your hair.
The flat iron in this video is a Remington Tstudio S8800.
The T studio
is growing on me, finally after two years of use! Perhaps I'm just resistant to change, but initially I was not a fan of the iron. The only thing I ask of my irons is that they are not bulky and have temperature adjustment.
Bulkiness:
On pure aesthetics, I think the cool touch ends make this iron look bulky. I wish they weren't there, even though I realize they have a functional purpose. I decided to overlook the bulkiness in exchange for other positive aspects. At this point I am just used to them and don't notice them very much.
Temperature and digital controls:
This iron warms up very quickly, about 60 seconds. I really love the digital LCD temperature display. It's very easy to set the temperature using the -/+ buttons. The lowest heat setting is 200 C and it goes up to 400 C in 20 C intervals. There is an LED indicator light that blinks when the iron is heating up or remains solid when it has reached a specified temperature. When I initially bought the iron I had problems accidentally pushing the -/+ buttons and inadvertently changing the temperature setting. It was really frustrating. I didn't realize you could lock the temperature. All you need to do is, let the iron come to temperature (solid LED light), and then hold the on/off button for 2-3 seconds. You can test the iron by pressing the -/+ buttons. Once I discovered this trick, I became more infatuated with the iron.
Nano-Silver Ceramic Plates
Apparently the plates are made of ceramic and micro-fine, nano-crushed particles of silver that have anti-microbial purifying properties. I'm not sure why one would be so concerned with microbes on the hair; I guess I could eat off my hair in a pinch. Whatever, I don't care too much about that, but I do appreciate that after 2 years, the plates look brand new. This is another great reason to love the iron.
Flat iron comparison:
I can't remember exactly, but I think I paid ~$25 for the Tstudio at Big Lots. Before the T studio, I used an Andis Ceramic Plate Flat Iron that I bought at Walmart for ~$12. I liked the design much better over the T studio, but the ceramic plating wore off quickly (within the first 2 years).
I used the Andis flat iron probably for 5+ years (worn plates and
all), before I finally stopped being lazy and replaced it. Although initially I was not happy with the replacement, the Remington Tstudio has proved to be a very nice work horse that I don't regret buying one bit.
There seems to be an influx in cosmetic monthly subscription services. One such type of service not yet available in the US, until now, is Glossybox. This one seems to be more geared toward higher end products, but only time will tell. There are many YouTube videos of non US ladies showing their boxes. I still haven't made up my mind on Glossybox, or in general these types of subscription services. That will be a future post, along with a proper review. Until then, take a look at the products (and swatches) for the month of April 2012 ... EDIT!: and read Pink Sith's blog post
While I play/write about these new goodies, please enjoy the following intro video to a few of the products in the Human Fundamentalism Collection. As you will notice, my one cat was going bananas while the other one watched ... because that's what frienamies do.
*products were sent to me for review*
The video was shot in HD so feel free click on that option. :D
Also, I would like to apologize for not being able to keep up with and respond to comments and emails. I find great pleasure in mingling and being silly with you guys, but the volume is getting a bit overwhelming and I just can't keep up. :( I'm sorry guys. It makes me sad. I will try my best to do what I can.
I don't know what it is about round/oval nails on my hands that just seems off. They seem to look elegant at some angles, while other times I'm just like, "what is going on here?" I am constantly doing double takes perhaps because my brain is so accustomed to the squoval. As a result, I filed my nails back into a more mentally acceptable shape for me, squoval. I made a short video in the process.
How to file your nails into a Squoval from Round/Oval:
All you have to do is create a flat top and rounded edges. Then, blend the two together to your desired level of squovalness.
I love to laugh ... especially at myself. I would like to share the giggles.
A while back I had yellow nails for what seemed like forever. I was dancing around that topic here and here.
Finally, I buffed so that I could do a video *see below* and not look like I had jaundiced smokers fingers. I am not so sure it really translated on film ... this is your first giggle.
Second, and perhaps this will result in a more hardy laugh ... just look at my face. Snooki was on set and I borrowed her face powder. My face usually always matches the rest of my body ... LOLOLOL. Anyway, enjoy ...
You guys know I love and have used DermaNail for many many years. I have a written review here, as well as a my original video on the topic here.
I will do a full review of the Cutemol at some point because although stinky, it has great ingredients I would like to emphasis.
Then again, why not?! Go grab your favorite nail file for shaping and try it! I have a long series on nail filing and shaping and am starting to do the video versions. Here are the posts from the past:
No joke, I break nails doing the stupidest things. I have kept my arm flailing to a minimum lately and have gone unharmed for months. The other day, however, I was so excited to buy nail polish that I flailed right into a shopping cart ... blammo! Please, can we turn back time?! A girl can dream. In reality though, I saved the nail. I have posted on this before, way back ... part I, II, III and IV, but this time I made a video!
I'm going to preach for a second ... then a video ;)
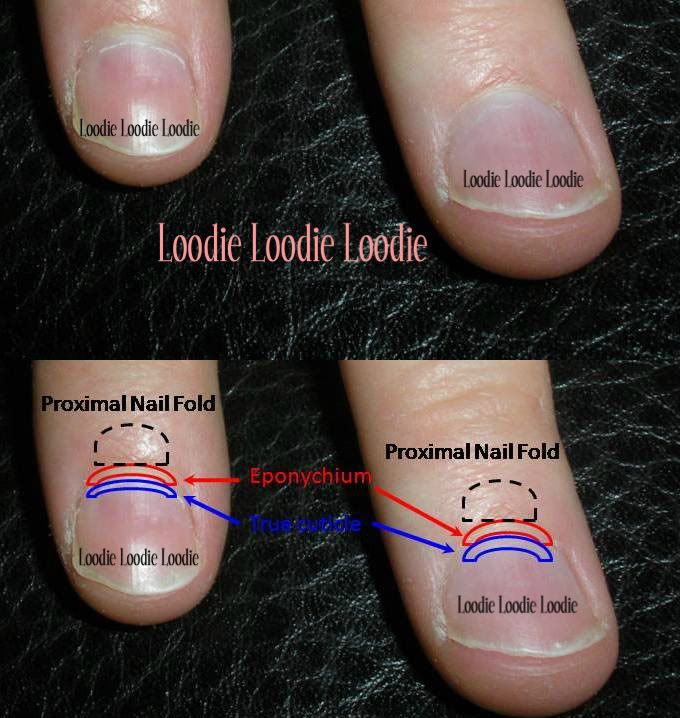
One of the most important aspects of taking care of your nails is moisturizing the nail AND cuticle. Moisturizing the nail beds is fairly self explanatory, but recently I realized there is some confusion as to why we must moisturize our cuticles. Yes, part of the reason we moisturize our cuticles is because we don't want them to look to' up from the flo' up. More importantly however, the root and matrix of the nail is located right below the cuticle, slightly under the (proximal fold) skin. Lets review the nail.
My lovely husband volunteered his tremor hands as specimens in this earlier post. Let's continue to mock him.
At the base of the nail is your "cuticle". As I have discussed already this cuticle is actually made of two parts, the 'true cuticle' and the 'eponychium'. Underneath the proximal nail fold is the root and matrix, i.e. the heart of your nail.
Because the nail root is near the cuticle, moisturizing the cuticle creates the moisturizing environment needed to keep the nail flexible from the very start of its growth cycle. Eventually your nail will fully grow out from cuticle to tip having been moisturized the entire way up. It takes about 6 months to grow out a nail fully from root to free edge.
Since many of us keep our nails painted at all times, it becomes even more important to moisturize the cuticle since moisturizers can not penetrate through polish to moisturize the nail bed.
Keeping the nail and cuticle area consistently and frequently moisturized will promote a healthy nail bed, which will allow you to grow healthy nails at any length. When a nail plate balances both hardness and flexibility peeling and breaking can be prevented. I previously talked about the importance of moisturizing the nail and cuticle in this post and also an alternative here.
As I said in my first moisturizing post, there is no "right" moisture delivery system. It's up to you to choose what is "right" for you. The only real rule is to use them ... consistently and frequently. Seriously, moisturize like it's your job!
The follow video goes into a few options, but it is in no way the end all be all, just random stuff I grabbed around the house. I also go into what I prefer and how I do my thang!
If you are looking for a cuticle oil recipe head on over to For Me It Works. This chica has such lovely nails because she too is a stickler for MOAR MOISTURE!
Ugh, got a peeling problem? Let's nip it in the bud ... without sacrificing nail length.
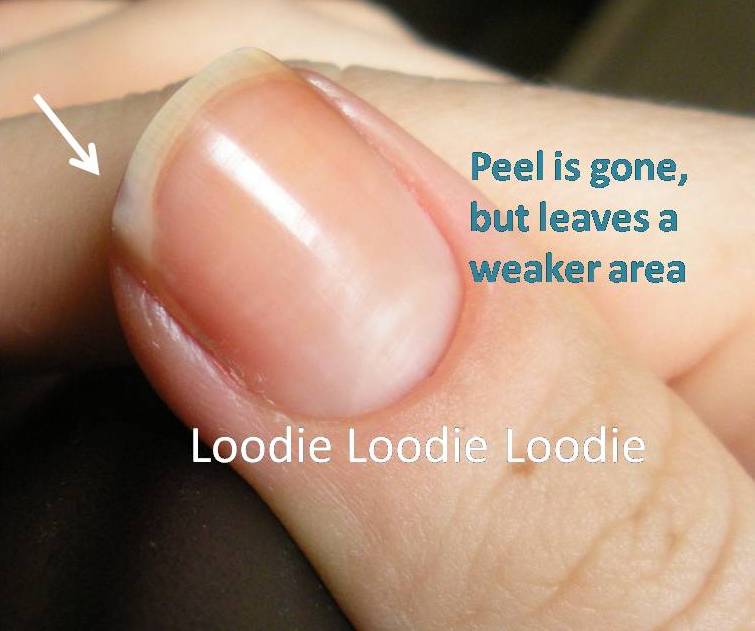
Here is a before shot of the peel. Click to enlarge. You may not even be able to see this, but this is the best I could do in the evening. I just couldn't wait till day time to fix it ... ya know how panic mode goes.
Here is a day time shot after buffing out the peel. As you can see the peel is gone, but the buffing does create a weak area. Polish will not adhere in this area as well and I will show proof of concept at the end.
Before you run for the buffing block you should understand some people with very thin nails should just avoid it all together. Buffing will only make your thin, weak nails worse. Perhaps it would be best to take down the nail length instead.
As always, you need the right tools for the job. If you are NOT familiar with nail files and their corresponding grit strength you may want to check out ... X-Files
Now for the tutorial ... in video form! :D
Again ... buffing is not evil. You just have to evaluate whether your nail is a good candidate and then be gentle.
The blog review of Dermanail here. EDIT: They asked me to appeared in one of their promotions here! :D
OMG and guess what?!?! I noticed a peel on my thumb yesterday, so last night I made a video on how to get rid of it!!! Yay! FINALLY! Okay so still I am slow and have to find time to edit it etc, but now you have something to look forward to! :D
Blogger broke and erased this post, so here it is again.
The proper version (written with lots of pictures) of this post can be found here, however here is a YouTube video if you're into that sorta thing. I have to admit the written version is more useful, but hey what eve's ...
I made a video way back when and just now got around to posting it. In the video I am using Blue Cross cuticle remover, but as I mention Sally Hansen is also a popular one. Also, in the video I use a q-tip to apply and remove the dead skin; if you don't like that, use a wooden stick to remove the skin. I hope you enjoy my awkwardness!
Here are some relevant posts I mention in the video.
I am super excited! BlAAAHH. I just uploaded a You Tube video and the endorphins are still kicking, lol. I thought it would be a good idea to start doing videos some time ago in addition to the posts because sometimes pictures aren't enough. Anyway, my hope is that they will be a nice compliment to the written posts. So, here is the first meaty video ....
There is another introductory video which you can watch, but don't let me bore you.
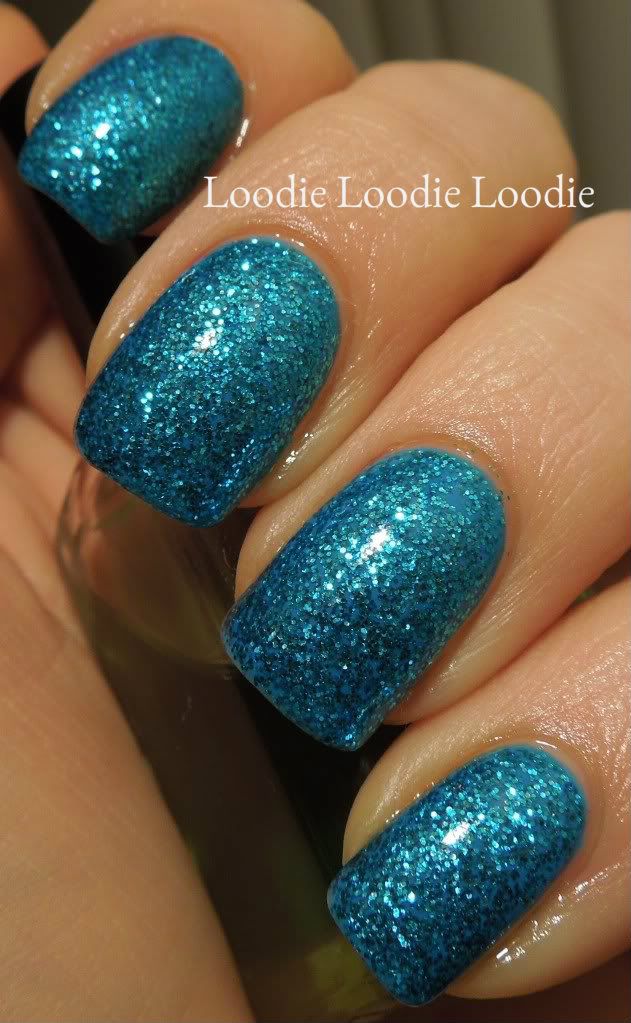
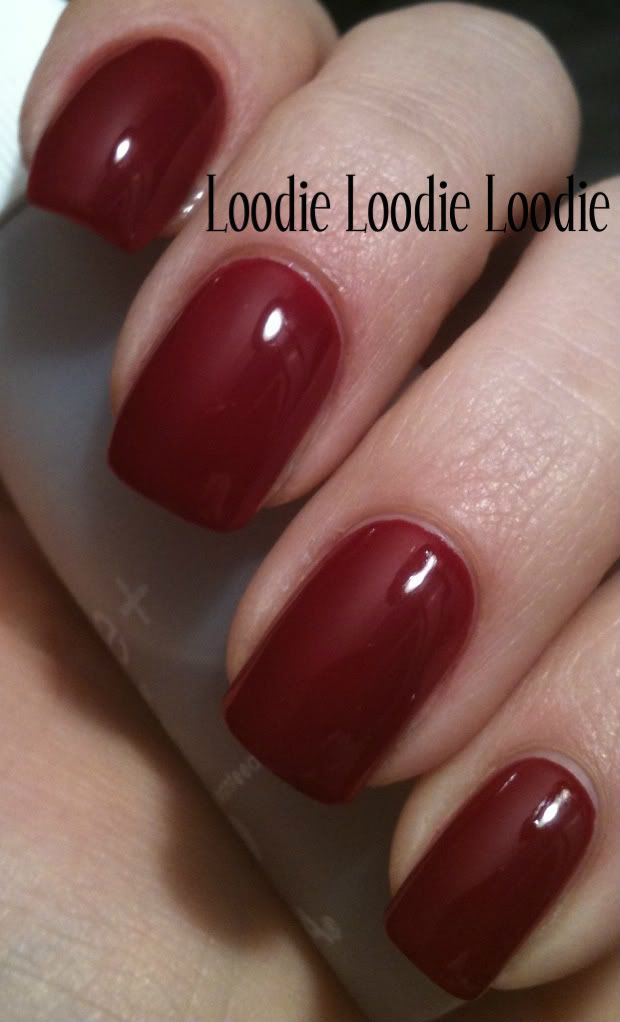
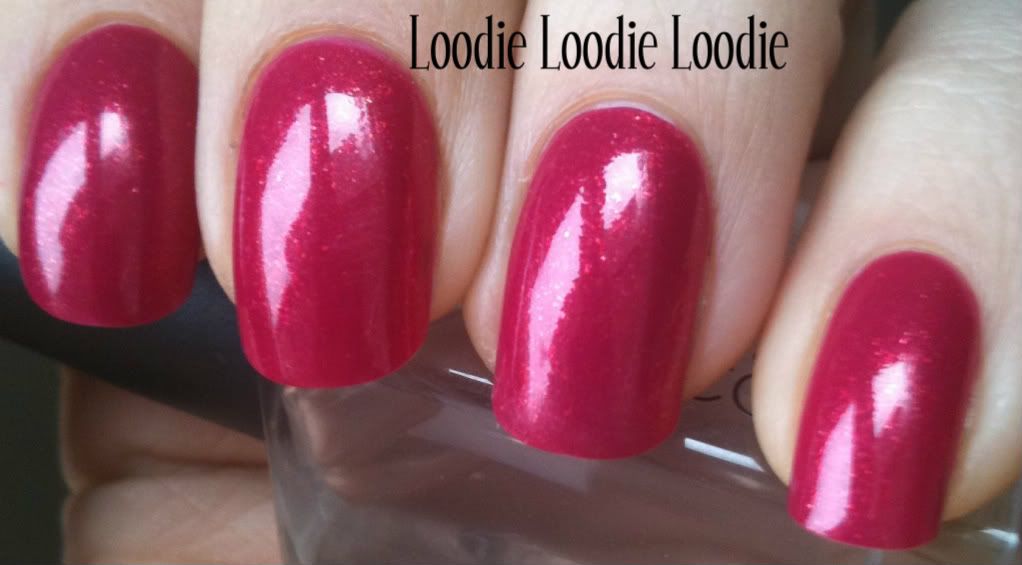
 KleanColor - Midnight Queen