Showing posts with label Square. Show all posts

Friday, July 20, 2012

Thinner nails in 10 minutes or less!

Could your nails stand to loose a few?  Do you have extra saddle bags that seem permanent and unruly.  Well now, your nails can appear thinner with a few simple steps!

 
In a few previous posts, I have shown you just how chubby your nails can get when they consume copious amounts of water.  Look here, here and here.  But what if after shrinkage (i.e. tightening of your C-curve) they still seem to bulge and look obese?  Or what if your triangle shaped nail is making you feel down and out?

No fear!  Here is a techniques you can use when painting your nails to make them appear thinner.

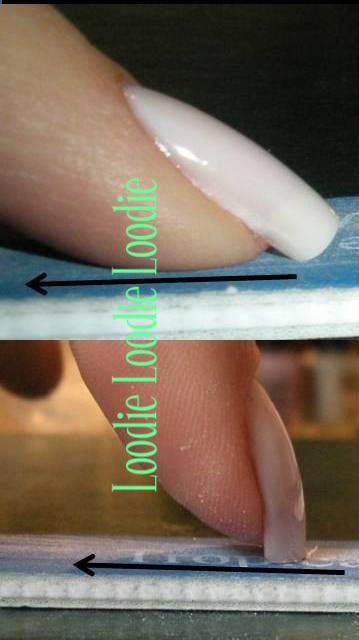
First a little rollie pollie finger okay?


Click on any of these pictures to make them larger.

One coat of China Glaze - Vertical Rush

This nail is fully dried thus the C-curve has done all it can do to make the nail appear thinner.  The bulge is permanent.  Note that, it may look like I have polish on my skin at the sides of the nail bed, but I assure you I don't (pictures below). 


What to do?


If you are proficient at painting your nails, you can skip further down, otherwise....

Grab a fine cosmetic brush and acetone.

Here are a few examples:
The brushes with the black ferrules and white handles are no name brands, while the black handled silver ferrule brush is a Swissco brand, and the white handle silver ferrule brush is by ELF.  


Also grab a small piece of paper towel to wipe off excess acetone and polish.


Here is a shot of one of the sides.

1. Dip your brush in acetone. 
2. Get rid of excess acetone from the brush by lightly touching the brush against the paper towel
3. Run the brush along the nail side walls making a clean line.
4. Wipe off the polish on the paper towel.
5. Repeat steps 1. - 4. until you are happy with the lines.


You can take off more or less.  It seems on this side I took off a bit less polish.


If you are a proficient nail painter, just avoid painting the entire nail; leave a clean line at the side walls.


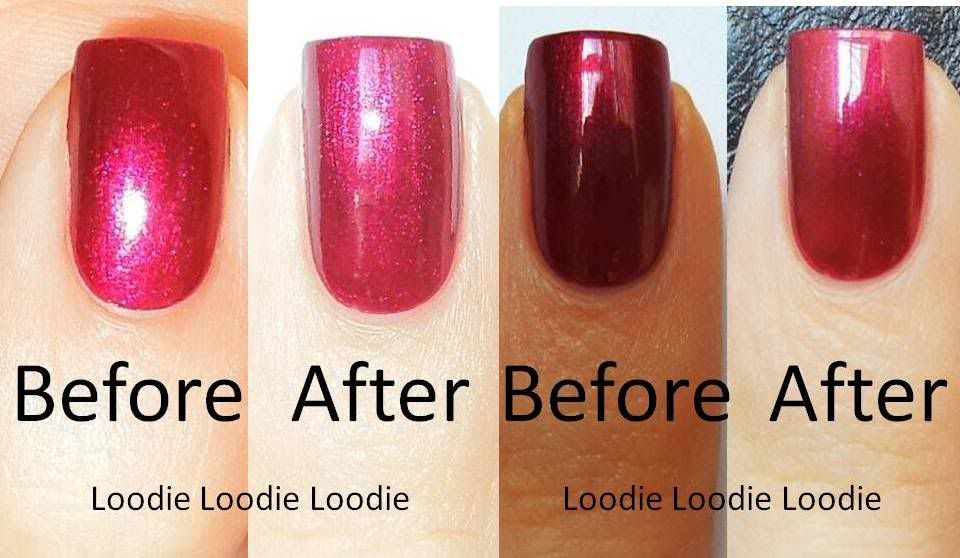
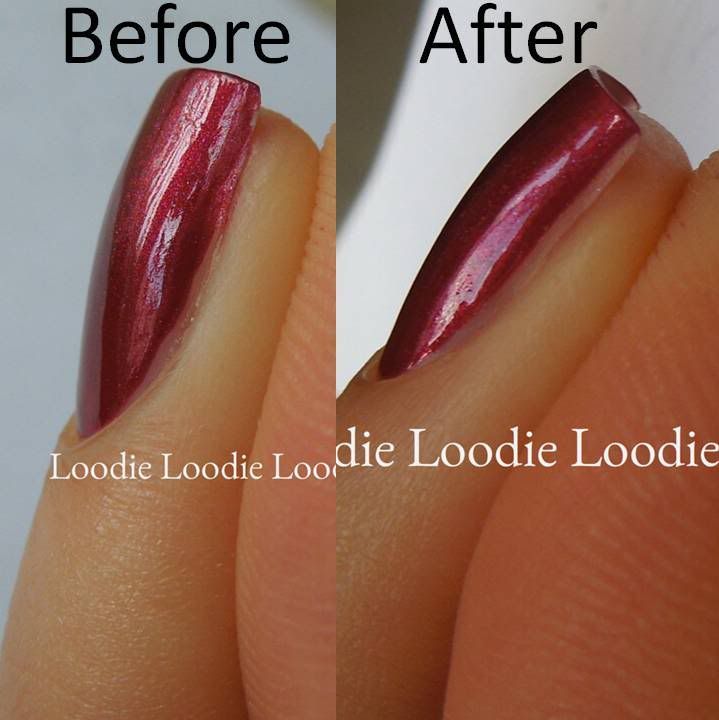
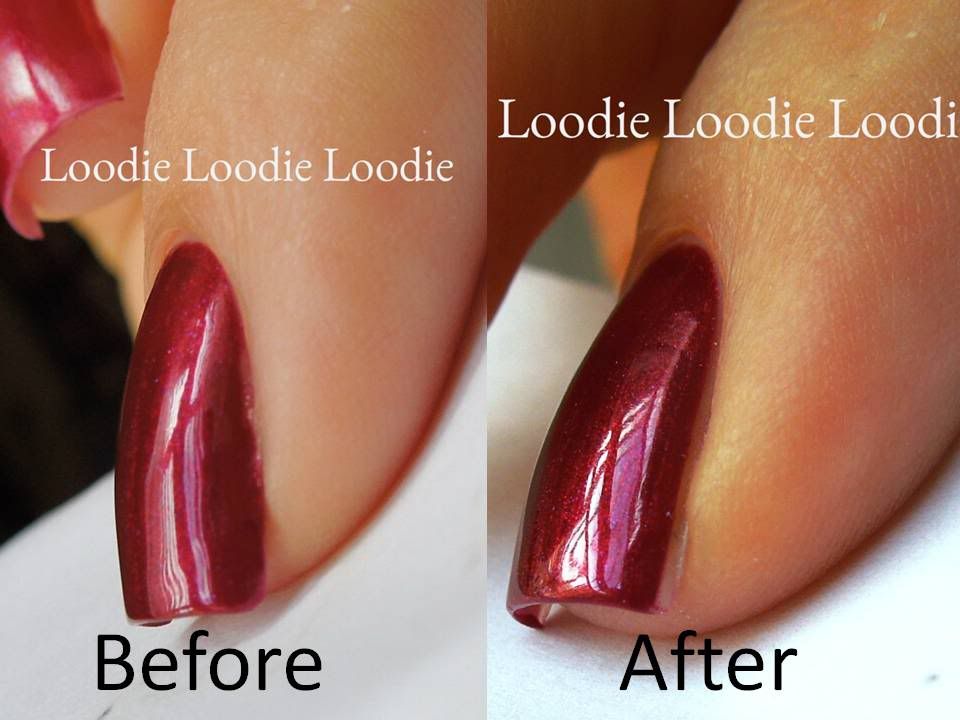
Here are a few before and after shots, head on. Depending on your own nail shape you may see only a subtle difference.  The flatter your nail (less pronounced C-curve) the greater the affect you will see. 


Here is a schematic for different nail shapes:


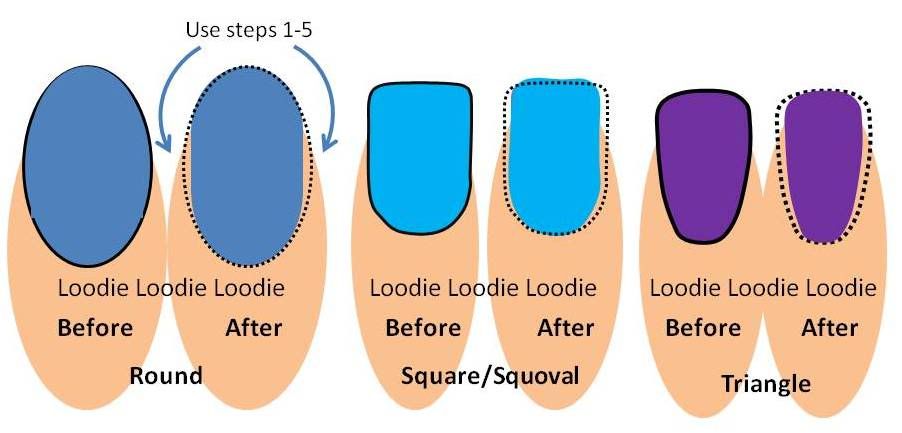
Each nail bed shape can appear thinner.  Since no filing of the side wall is necessary, you can maintain the integrity and strength of the nail bed.

Although this is a very effective technique, I am sometimes bothered that a portion of my nail bed is not covered with polish.  It will look good far away or head on, yet when I bring them close to my face and see them from the side, I have a raging desire to fill in the gap.  I struggle with them looking fat vs. thin. 

Do you ever use this technique when painting your nails?

Thursday, January 12, 2012

Don't be a square ...

Then again, why not?!  Go grab your favorite nail file for shaping and try it!  I have a long series on nail filing and shaping and am starting to do the video versions.  Here are the posts from the past:

X-Files Post and Video
Nail Shape and Balance Post
Taking Down Nail Length Post
Shaping the Free Edge - Square and Video
Shaping the Free Edge - Oval and Video
Shaping the Free Edge - Squoval and Video
Sealing the Nail Plate
Buffing out a peel

Video: How to file your nails into a square shape


My YouTube Channel


Hugs to Arlyn ... it's a start ;)

Monday, November 29, 2010

Ready, Set, FILE! - Square

This post will show how to file the nail free edge into a square shape. Obviously free edge is necessary, but the more the better because otherwise the nail corners maybe somewhat round.  However, if you keep at it you can eventually get sharp corners (that is if you want it).

Previously, I went over how to take down nail length and files, so you may want to visit those posts, there are some good tips. If you are not sure if square is right for you, the post on nail shape and balance may be helpful.


Nails with a high arching C-curve can easily achieve this nail shape and require the least amount of filing. If your C-curve is not as arched you may need more length or work on the side walls to achieve this look. I have to warn people, however, about messing with the side walls of their nail bed. I have found it is vital to nail strength so I discourage people from filing it, but if you must I have a few tips.


Before you begin you need a proper file.  I already posted on what I prefer and why so I suggest you check it out before you read on.  In general, a file with a grit strength of  320/400 will work for shaping.

Here is a before and after picture.


The before nail is some what squoval and we are going for a square nail shape.

I think this nail shape is the simplest for high arching C-curves because you only need to file straight across. Keep the file straight and steady in the horizontal direction (to the nail bed) until it is square enough to your liking.


I do have a few tips.

If you are filing in a horizontal direction, either sawing away with the proper grit file or in one direction, you will eventually end up with "nail shavings."


There may be shavings under the nail or on top as shown in the pictures.  We need to eliminate them to have both a clean look as well as to help seal the nail plate.


To get rid of the "on top" nail shavings:

1. Start the file flush with the nail bed
2. In one sweeping motion, of down and around, move the file 270° around the nail tip.


To get rid of the "under" nail shavings:


1. Place the nail at either a 45° angle OR 90° angle to the file.
2. File down in one direction.

Either will work depending on how square you want it. The 45° angle will give you a softer square look, i.e. rounder edges.


Although these steps will help seal the nail plate, sealing is best done with the polish off and will be covered in another post.  


Another way to soften the square shape is to take a finer grit file (320 or 400) and file from the corner to the center of the nail bed as shown in the pictures.  You can see the nail looks slightly more round on the right.  Now we are getting into the realm of squoval, and that will be another post.


Now a few words (and pictures) about filing the side walls of your nails beds.


If you are going to file the side walls, do not do it like this. Filing this way can injure the cuticle, skin and weaken the nail walls where a good bit of strength lies.


Here is a picture of one my nails. I used to have trouble with splitting and breaking right at the edge. The more I would file the side the more breaks I would get. The nail would crack before I could grow it very far from the free edge. Keeping that side wall intact (along with other things I will link here soon) eliminated that problem.

So is there a "safe" way to file the side wall? 


If you must file, to even something out, make sure the file only hits the free edge and lies at least at a 45° angle to the nail side wall. Be very gentle and light handed. Use a high grit of at least 400 to be as gentle as possible. (Ignore that I have a 320 file pictured, its for demonstration purposes only.)


Video version of the square shape can be found here.


If you have any questions or comments please let me know.
Now I have to grow my nails a bit so I can show you Oval and then file back to Squoval!

Other posts about filing:
Files
Nail Shape and Balance
Taking down Nail Length
Oval Post and Video Post (to be linked)
Squoval
Sealing the nail plate